Website migrations in the Nimbus Platform
This article outlines the website migration feature in the Nimbus Platform. This feature is designed to automate as much of the migration process as possible.
While the tool aims to support a wide range of website configurations, its primary focus is WordPress. You may have issues with other frameworks, such as Magento 2, which require manual intervention after the files and database are migrated.
NoteNode.js is unsupported by the platform as a whole. Although this tool copies the files and databases related to a Node.js site, some manual setup is required to get Node up and running again. We will happily do this for you -- please contact your account manager to book this in.
What the migration feature includes
- Creating a website on the destination server that is a copy of the website on the source server.
- Copying all website settings including:
- PHP/PHP-FPM version and settings.
- Custom NGINX configuration.
- Scheduled (Crontab) tasks.
- Additional domains and redirects.
- Email SMTP relay configuration.
- Search engine blocking.
- Password protection.
- Website suspension.
- Existing SSL certificates and Let's Encrypt configuration.
- Dumping all databases associated with the website.
- Copying all files under the source website to the new server.
- Importing databases to the new server.
- Creating a preview URL for any websites that have custom domains.
What the migration feature does not include
- Tracking or automation for website DNS changes.
- Configuring Node.js websites.
- Copying Git deployment settings.
- Copying backups between servers.
- Copying databases that the Platform does not know about.
- Copying RBAC user permissions for servers.
Starting a new migration
When you need to migrate from an existing server to a new server in the Platform, follow these steps:
-
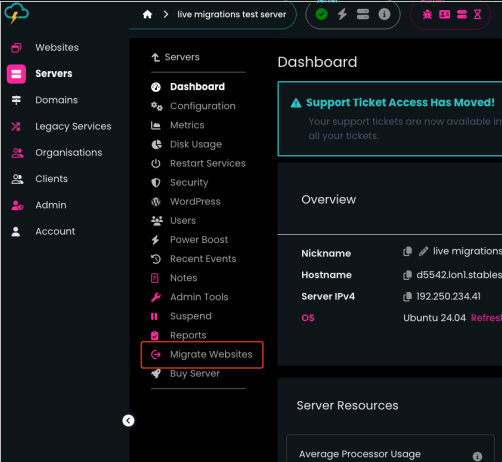
Navigate to the server dashboard for the old (source) server. You can do this using the global search in the top right of the interface.
-
On the server dashboard, click Migrate Websites:
-
To begin setting up a new migration, click New Migration:

-
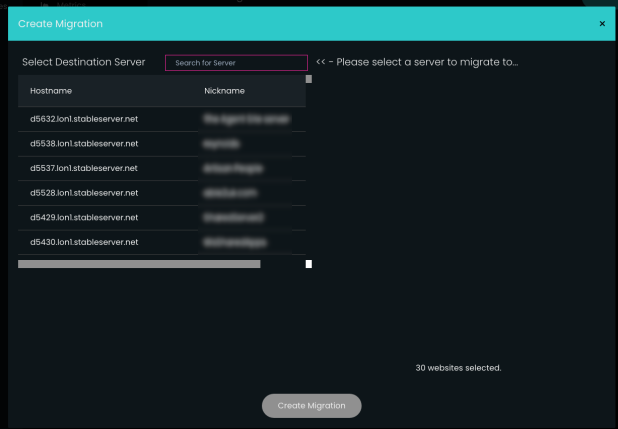
The Create Migration section appears. Select the new (destination) server that you would like to migrate the websites to. There is a search box at the top to help filter the list:
-
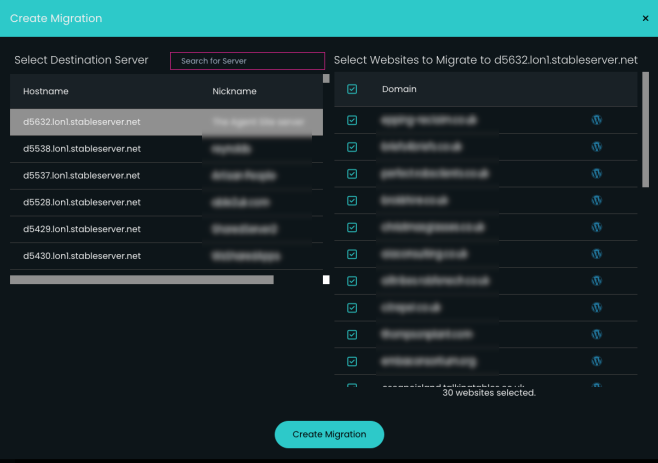
After you select the destination server, a list of websites on the source server which can be migrated appears. Select the websites you want to migrate. There is a select all checkbox at the top of the table:
 Note
Note- Any websites which have already been migrated from the source server to another server appear with an In another migration message.
- Any websites which have already been migrated to the selected destination server are not selectable, and appear with a Domain exists on destination warning message.
-
At the bottom of the Create Migration section, click Create Migration.
-
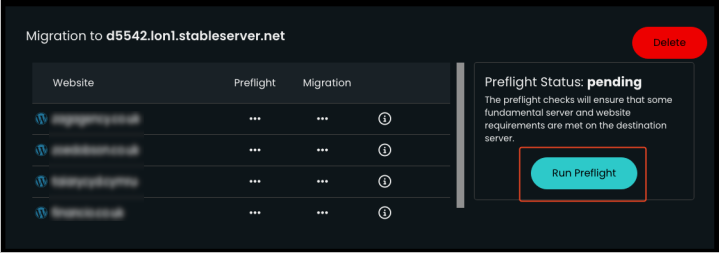
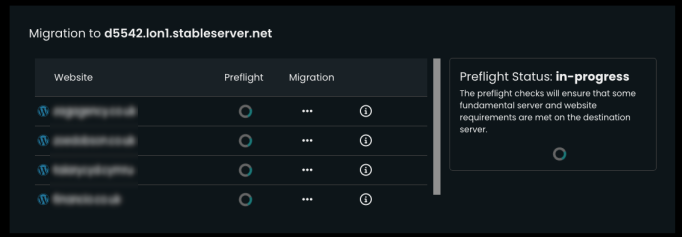
Click Run Preflight at the right of the panel:
-
If the Preflight process starts successfully, loading indicators appear:
 Note
NoteThe Preflight process does the following:
- Creates an SSH key so the source server can connect to the destination directly via SSH.
- Updates the firewall on the destination server to allow SSH connections.
- Updates the firewall to block any IP addresses that are blocked on the source server.
- Enables the following on the destination if enabled on the source:
- PCI compliance.
- Block bad robots.
- Restricts public access to Cloudflare IP addresses only.
- SMTP relay.
- Redis.
- Checks all required versions of PHP exist on the destination server.
- Gets all PHP modules of PHP versions which are in use on the source and ensures they are present on the destination. It also attempts to install them and returns an error if it fails to do so.
- Ensures that the version of MariaDB is the same or higher on the destination server.
- Compares the MariaDB settings between the servers and updates them on the destination where appropriate. If this fails, it returns an error.
- Ensures there are no websites on the destination server with the same domain as any being migrated.
- Ensures there is enough space on the destination server for all of the websites being migrated.
- Checks if any of the websites have running Node processes. If any are detected, a warning appears. However, the migration can still take place. Some manual intervention is required to get the Node processes running on the new server.
- Checks if any of the websites are connecting to external databases. The migration can still continue if this is the case.
-
If there are any errors as a result of the Preflight process, try to address them. Then click "Run Preflight again to re-check the requirements.
-
After the Preflight process is successful, click Start Migration at the right of the panel:

-
The panel updates, and the Migration column in the table displays the progress of each website:
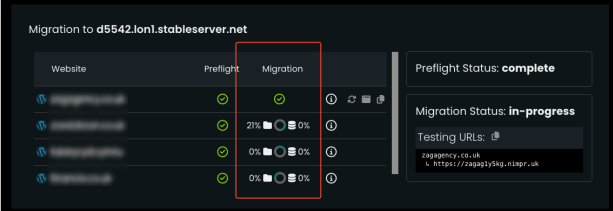
Completed websites show a green tick, while websites in progress show a spinner and progress percentage of website files and databases.
Post-migration
If there is a problem during migration of a website, the migration status shows a red X icon. Hover over the icon to see a brief reason for the failure:

For more information regarding the jobs which ran, click the information (i) icon to the right.
The following section shows on the right-hand side information about the website being migrated and the associated jobs. In this example, the Install SSL Files job failed:
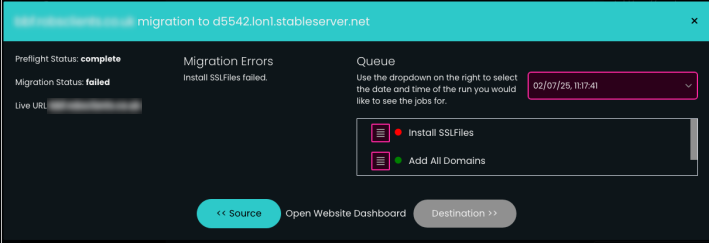
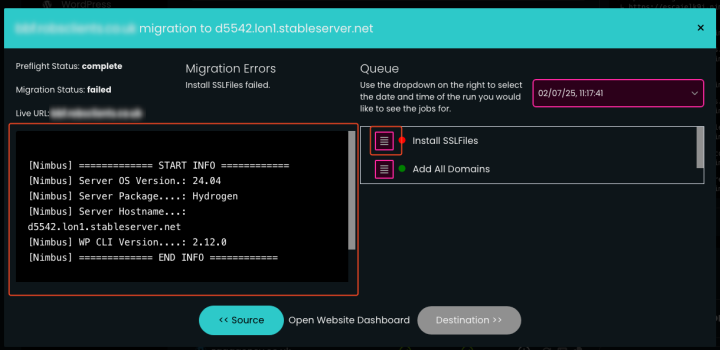
Click the icon to the left of a job row to view the job output. This may provide a root cause for the issue:
To retry the failed jobs, click the retry (double-arrow) icon to the right of the information (i) icon:

After a website's migration status changes to complete, new icons appear on the right of the website row in the table:

From left to right these icons are:
Re-sync files and database
This option re-runs only the jobs responsible for transferring the website files and databases. You can use this if you have a transactional website, or if you have made changes since the original transfer, and would like the site to be updated on the new server.
WarningBe careful with this option -- it overwrites the website data on the destination server. If any changes have been made on the destination server, they will be lost! Do not use this option if the DNS has been updated and the site is live on the new server.
Open Website Preview
This option opens a temporary URL to preview the website. This enables you to access and test the site on the new server before the DNS is updated.
Copy Website Preview URL
This option copies the website preview URL to your clipboard.
Testing URLs
In addition to the previous three icons, there is a Testing URLs section on the migration panel containing testing URLs for all of the websites in the migration:

At the top of the section, click the clipboard icon to copy all of the URLs to your clipboard:
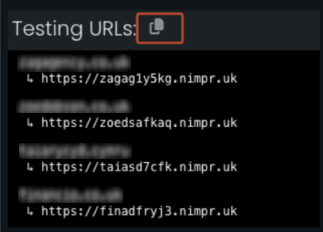
These URLs are in the following format:

Traffic forwarding
To make the transition to the new server seamless, there is a traffic forwarding feature. This feature sets the source server to forward all web traffic to the new server, instantly making the websites live on the new sever. You can then update the DNS separately to avoid any disruption.
Important
- As soon as traffic forwarding is enabled, websites are no longer accessible on the old server. You should only enable this feature after all sites have been migrated.
- The new servers do not support IPv6. To avoid disruption, we recommend deleting any IPv6 records pointing to live websites before migrating them.
After all websites have been copied to a new server, the Traffic Forwarding option appears:
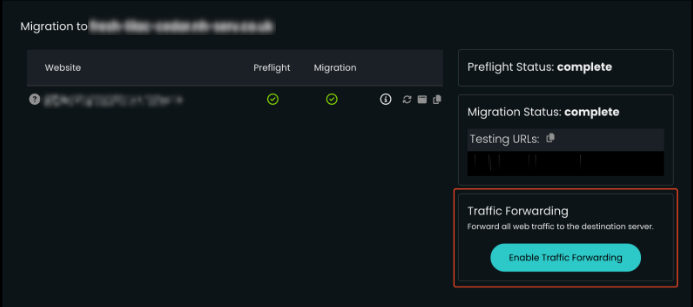
To enable the traffic forwarding feature, click Enable Traffic Forwarding.
NoteWhen traffic forwarding is enabled, the only feature available on the source server is disabling traffic forwarding. No other server features are available.
FAQ
Can I migrate websites on one server to more than one server?
Absolutely! To do this, just create a migration to a server and select a subset of website. Then you can create another migration to another server and select the remaining websites to be migrated there.
Can I migrate a single website individually later if I missed it in the original batch?
Yes, you can migrate any number of websites at any time. There’s no requirement to migrate all sites from a server in one go.
Can I re-run failed jobs multiple times? Are there any rate limit or timeout considerations?
You can re-run failed jobs as many times as needed. However, we recommend you identify and resolve the root cause of the failure before retrying the job.
What happens if DNS is changed before re-sync or testing is done?
Updating DNS too early may cause site issues, especially if not all jobs have completed or post-migration testing hasn’t been done. This can lead to avoidable customer-facing problems. Always test the site using the preview URL and obtain customer approval before updating DNS.
How are Node.js apps handled after migration? Is there a guide for the manual intervention?
Currently, Node.js is not officially supported by the Nimbus Platform. While the files and databases are copied, you must manually set up and configure the Node.js environment on the new server. However, we will happily do this for you –- please contact your account manager to arrange this.
Does the migration handle mail services or cron jobs?
The Nimbus Platform does not support hosting mail services (other than SMTP relay). Website-level cron jobs defined in the Platform are copied across with the site.
What happens if a migration is started but abandoned? Is there any cleanup?
Currently, partially completed or abandoned migrations remain visible in the interface. Manual cleanup may be required depending on what stage the migration reaches.
Is rollback possible if a migration fails?
There's no automatic rollback feature. However, as long as DNS hasn't been updated, the live site remains on the source server. The safest approach is to complete and verify the migration before you make any DNS changes.
Can I schedule migrations for a future time?
No, you must start migrations manually. Scheduling for a later time is not currently supported.
Updated about 1 year ago